Showing posts with label CRAFTS. Show all posts
Showing posts with label CRAFTS. Show all posts
Sunday, June 21, 2015
Tuesday, June 16, 2015
FLOWER QUIET BOOK PAGE
Flower -Quiet Book Page
The flower petals are attached with velcro, so when learns numbers we can pull them
off and place them back in order.
Materials Needed
- Felt clothes
- Velcro dots
- gum
Instructions
Step -1
Cut out yellow
felt cloth into circle shape.
Step-2
Cut out red felt
cloth into petal shape. Attach Velcro on backside of each petal. So they can
pull them off and back in order.
Step -3
Cut out white felt
cloth into numbers and gummed on the petals.
Step-4
Cut out the green felt cloth(or whatever color your
pocket is) into a pocket or basket shape.(petals can be stored in the pocket at
the bottom of the flower).And gum this pocket at the bottom of the stem.
Step-5
Cut out green felt cloth into strip for stem. Gummed it
on the bottom of the circle.
ABACUS QUIET BOOK PAGE
Abacus-Quiet
Book Page
Kids can move and count the beads
on a yarn.
Materials
used
- Black yarn
- Blue felt strips
- Beads
- Gum
Instructions
STEP-1
Cut
two strips in blue felt cloth.
STEP-2
Take 6 yarns-I used black yarn with beads strung on it,
and then laid blue felt strips across the ends, and gummed it down.
CLOCK QUIET BOOK PAGE
Clock –Quiet Book Page
You
will need
- Felt clothes
- Gum
- Glitter pen
- Button
Instruction
Step
-1
Cut out orange and blue felt clothes into square and
rectangle shapes.
Step
-2
Step
-3
Step
-4
Step
-5
Add the numbers. (just write using glitter pen)
Step
-6
Make the arrows, one larger than the other.
Step
-7
SEASON QUIET BOOK PAGE
Autumn and summer Season Quiet Book Page
he
page is a tree that changes with the seasons—there are autumn leaves to place
on the tree in autumn and bright green leaves for summertime (which can all be
stored in the grass pocket at the bottom of the tree).
Material
Used
- Brown felt cloth
- Orange and yellow felt cloth (for autumn leaves)
- Green felt cloth (for summertime leaves)
- Green felt cloth (for pocket)
- Gum
Instructions
Step-1
From your green felt, you are going to want to cut green
leaves for summertime.
Sew on Velcro or use Velcro dots where you want your leaves to be on the tree.
Sew on Velcro or use Velcro dots where you want your leaves to be on the tree.
Step-2
Cut out the brown felt into the shape of a tree and
tree trunk.
Then gummed the tree on the page.
Then gummed the tree on the page.
Step-3
Cut out the green felt cloth(or whatever color your
pocket is) into a pocket or basket shape.
 |
| TEMPLATE |
Monday, June 15, 2015
APPLE TREE QUIET BOOK PAGE
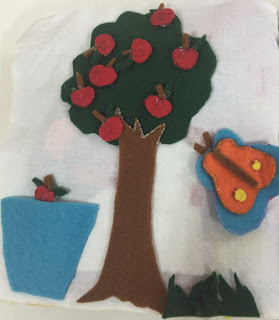
Apple Tree Quiet Book Page
The apples are on little snaps, and you can
snap them off the tree and put them in the bucket.
You will need
- Felt clothes(brown,green,red,blue and orange)
- Snaps
- Glue
Instruction
Step-1
From your red felt, you are going to want to cut out
eight apples
Step-2
Step-3
Cut out the brown felt square and the green felt
square into the shape of a tree and tree trunk. For the tree (green) part, I
just cut out what looks like a fluffy cloud shape, and then when I gummed it on
the page, I set the brown tree trunk part in front of the green cloud shape so
it looks more like a tree top with the branches protruding it.
Step-4
Cut out the blue felt (or whatever color your
bucket is) into a bucket or basket shape. Make sure that the bucket mouth
(width in between the handles) is big enough to fit the width of an apple in.
And make sure to cut the bucket deep enough to fit a few apples in there.
Step-5
Step-6
WEAVING GAME WITH A PIE-QUIET BOOK PAGE
Weaving
Game with a Pie-Quiet Book Page
A weaving game with a pumpkin pie: Make a pie crust in orange felt cloth. Make six same-sized tan felt strips, then laid them on top of the pie and trimmed at an angle accordingly so they would fit into the circle nicely. I glued a straight line across the top three strips and along the side three strips, so you can flip them up and weave the crust together.
Subscribe to:
Posts (Atom)


